
Basics of Filtering
37c3317fd058; modified for Encode Wiki · CC BY-SA 4.0Filtering is everything you do to the picture between decoding the source and handing it to the encoder: cropping borders, fixing interlacing, removing noise or banding. Most clean modern sources need little or none of it. Filter when you can point at a specific defect, and compare the result with the untouched source, because every filter that repairs something also discards or invents some detail.
FFmpeg or VapourSynth
Section titled “FFmpeg or VapourSynth”FFmpeg’s -vf filters are fine for one-step jobs: cropping, scaling, a plain deinterlace, light denoising. VapourSynth is the better choice once you chain several filters, want higher internal precision, need masks or per-scene settings, or want to preview frames while you tune. This section uses VapourSynth with the vs-jetpack collection and gives the FFmpeg equivalent wherever it is good enough.
Filter order
Section titled “Filter order”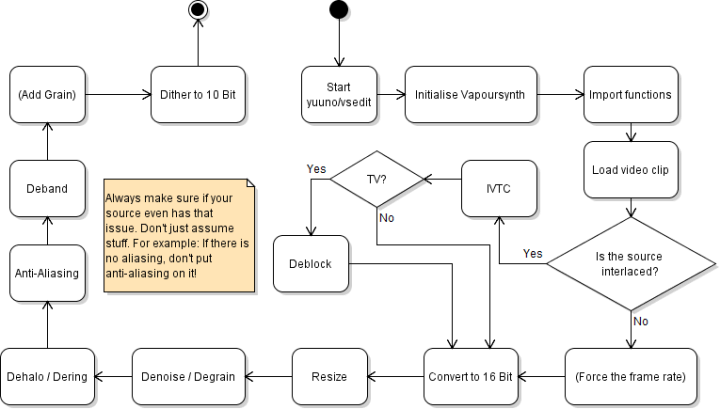
The usual order, skipping every step the source doesn’t need:
- Inverse telecine or deinterlace, on the source exactly as decoded. Anything that resizes or blends first mixes the fields and ruins the match.
- Crop.
- Convert to 16-bit, so later filters round less.
- Resize.
- Denoise, so noise doesn’t confuse the edge masks of the filters after it.
- Dehalo.
- Antialias.
- Deband, late because earlier filters can create banding.
- Grain, if you want it.
- Dither down to the output bit depth, usually 10-bit.
Check that the problem exists before you filter for it. Antialiasing a source with no aliasing only blurs it.
Starting script
Section titled “Starting script”import vapoursynth as vsfrom vssource import BestSourcefrom vstools import finalize_clip
core = vs.core
clip = BestSource.source("input.mkv", bits=16)
# filters go here
clip = finalize_clip(clip, bits=10)clip.set_output()BestSource.source loads the file frame-accurately (the first load indexes the whole file, so it is slow once) and runs vstools’ initialize_clip on it. That converts to the requested bit depth with dithering and fills in any missing colour properties (matrix, primaries, transfer, range). Without bits it converts to 32-bit float, which many plugins don’t accept, so pass bits=16.
Missing properties are guessed from the resolution, which is right for most sources and wrong for, say, a 1080p BT.709 master upscaled to 4K. When you know better, say so:
from vstools import Matrix, Primaries, Transfer
clip = BestSource.source(    "input.mkv", bits=16,    matrix=Matrix.BT709, primaries=Primaries.BT709, transfer=Transfer.BT709,)
These tags only label the samples; they don’t convert anything, so don’t tag HDR or unknown material as BT.709 to make a warning go away. See colorimetry for what each property means.
finalize_clip dithers down to 10-bit by default. Pass clamp_tv_range=True to also clip limited-range video to the legal range.
VFM only accepts 8-bit input, so for IVTC load with bits=None, do the field matching, and convert afterwards.
Cropping
Section titled “Cropping”Remove black bars so you don’t spend bits and encoder effort on them. FFmpeg’s cropdetect finds them; run it over a minute or so of bright footage, since dark scenes fool it:
ffmpeg -ss 300 -t 60 -i input.mkv -vf cropdetect=round=2 -f null -The last crop=w:h:x:y it prints is the answer. Look at the edges in several scenes before trusting it; bars are not always symmetric. For 4:2:0 video all four crop values must be even.
clip = clip.std.Crop(top=138, bottom=138)The FFmpeg equivalent is -vf crop=1920:804:0:138.
Resizing
Section titled “Resizing”Don’t upscale unless you have to. A larger file at the same quality is not a better encode, and the extra pixels are invented. When you do resize, the kernel matters.
The built-in resizers are the simplest:
clip = clip.resize.Spline36(1280, 720)Bicubic is fast and soft, Lanczos is sharper but rings more, and Spline36 sits between them. FFmpeg’s default scale is bicubic; use scale=-2:720:flags=lanczos for the sharper option.
vskernels offers more control, including resizing in linear light or with a sigmoid curve, which reduces ringing:
from vskernels import Catrom, Hermite
clip = Catrom().scale(clip, 1280, 720)clip = Catrom(sigmoid=True).scale(clip, 1280, 720)clip = Hermite(linear=True).scale(clip, 1280, 720)
Catrom (Catmull-Rom) is a sharp bicubic and a good default for downscaling. Hermite in linear light rings very little but thins fine lines, which some people dislike. Linear-light scaling only gives correct results when the transfer is tagged correctly.
For upscaling, EwaLanczos is a sharp general-purpose kernel, and NNEDI3 doubles resolution with a neural-network interpolator that keeps edges clean:
from vskernels import EwaLanczosfrom vsaa import NNEDI3
clip = EwaLanczos().scale(clip, 3840, 2160)clip = NNEDI3().scale(clip, 3840, 2160)  # alternative
Machine-learning upscalers such as Waifu2x and ArtCNN are available through vsscale, but they need ONNX models (vsscale onnx download) and an inference backend, and they can invent texture, so compare them with a plain kernel first. slow.pics is the usual place to put screenshots side by side.
Trimming
Section titled “Trimming”VapourSynth clips use Python slices. The end frame is exclusive:
clip = clip[1805:3185] # frames 1805-3184clip = clip[:1805] + clip[3185:] # cut that section out insteadclip = clip[3185:] + clip[:1805] # reorder: second part firstTrimming only affects the video. Apply the same cuts to audio and subtitles, and check sync after muxing; see audio and subtitles.